

I’ve just gone through a life altering experience. I reorganized my pantry. It was more of a project than I anticipated including scope, time, and effect on other parts of my life. Tidying a spot that takes up just 16 square feet created upheaval in about 500 square feet of the rest of the condo. I’m quite satisfied with the result but it felt like an emotional roller coaster at times. (Oh the new basket came! I can finally finish this project! Oh crap. I measured wrong. The basket doesn’t fit. How do I print a return label? %@$& we’re out of ink! Will I ever be able to put the kitchen back together again? How does Marie Kondo keep a smile on her face through the whole thing?)
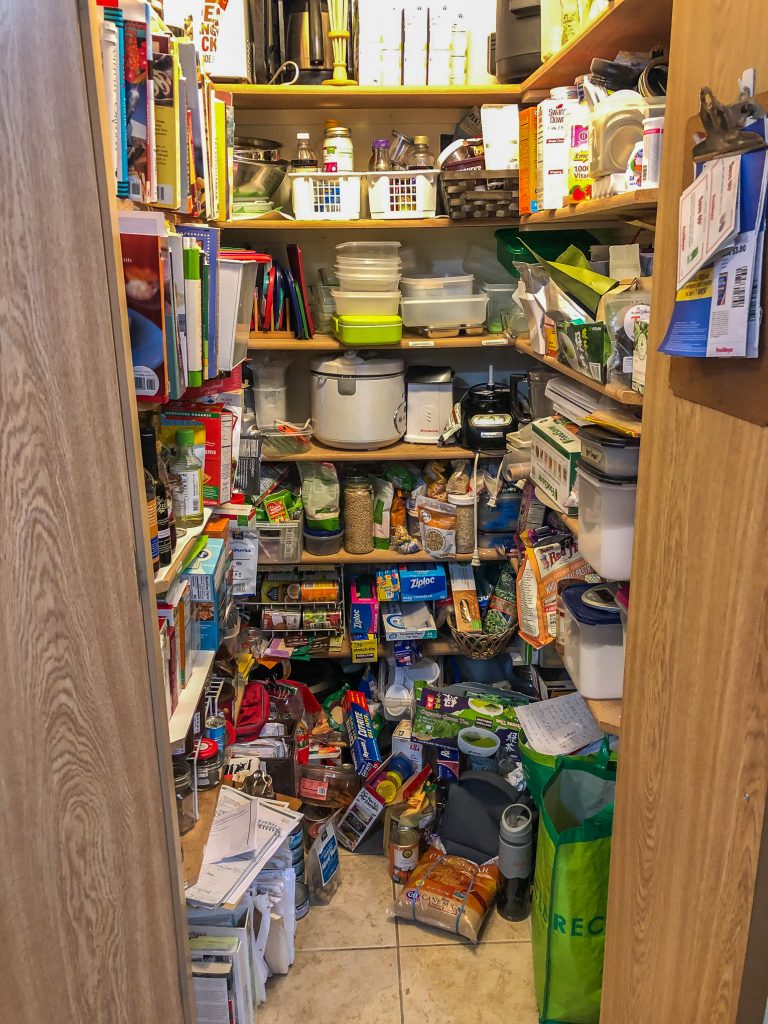
I had two thoughts about the experience: (1) this was a good “start the new year off organized” project, and (2) I’ll keep the resultant emotional suffering to myself. But then part of my process included searching Pinterest for pantry storage ideas. Turns out lots of people reorganize their pantries, provide photographic evidence, and even blog about it. So on the off chance my three-week tidying adventure is somehow inspirational or humorous (or serves as a cautionary tale), I decided to share some of the highlights and lowlights.
This was essentially my process:
- Empty everything out of the pantry.
- Immediately run out of flat surfaces in your home to put the pantry contents on until the reorganization is complete. Contemplate putting towels down on the floor and setting food there, hoping the kitties won’t knock it over or compromise food safety.
- Throw away expired food. And food you forgot you bought. And food you decided you didn’t like.
- Measure the shelves. (My mantra: measure twice, click “buy now” on Amazon once.)
- Take stock of what needs to go back in the pantry and how you’d like it stored: bins, baskets, airtight containers, etc. Make a list so you can feel some false level of control in the middle of chaos.
- Choose storage containers and order them online.
- Mark on your list which items you purchased for which foods, otherwise you will forget by the time Amazon Prime gets it to your front door.
- Bemoan the hours you spent on the internet chasing rabbit holes looking for idealized canned food storage ideas.
- Wait impatiently for products to arrive so you can mark this damn project off your list.
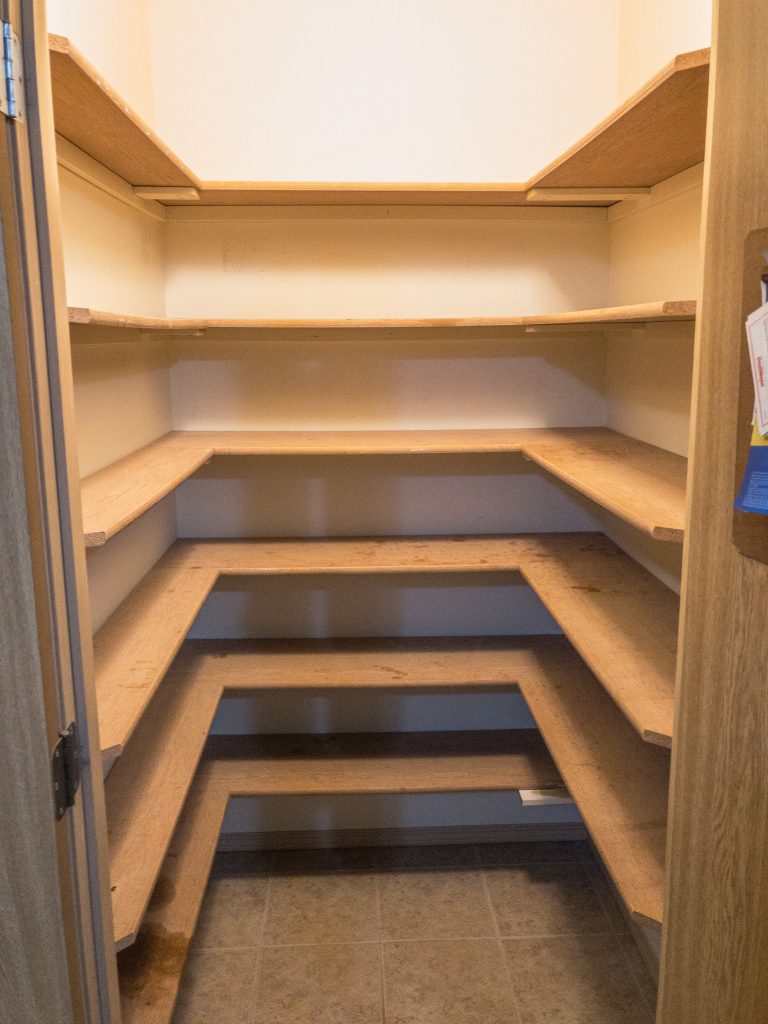
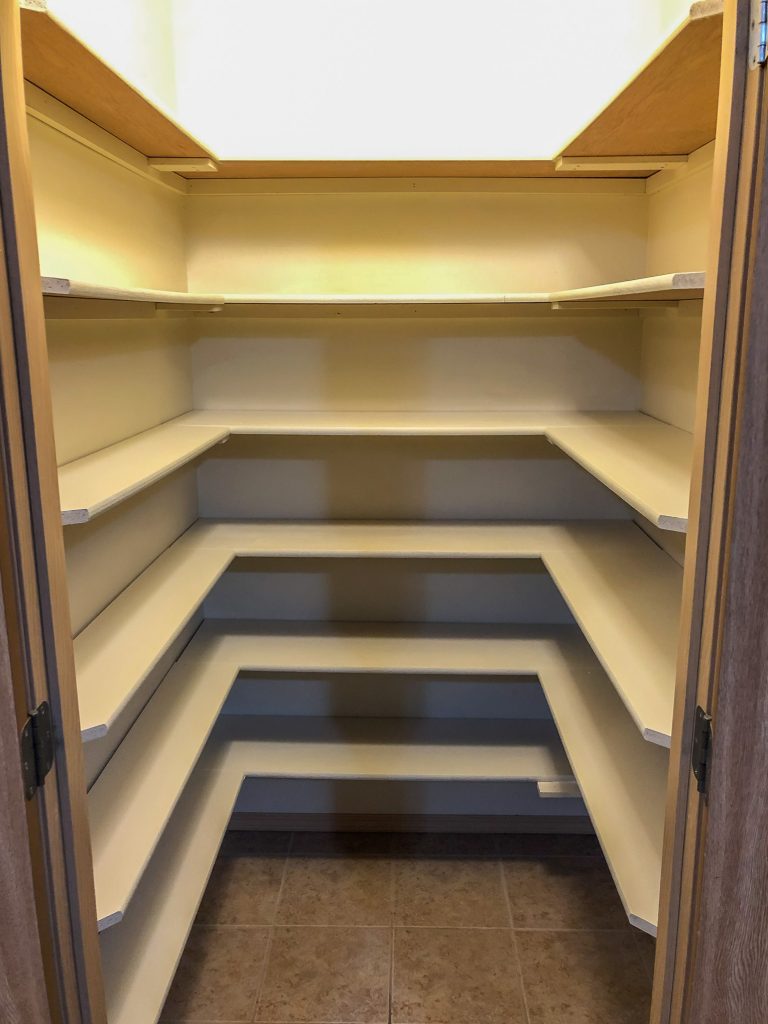
- Clean the pantry shelves and floor. Realize some of the stains aren’t coming off.
- Paint the shelves and walls to cover up these stains. (Note: steps 1-11 take about 1 1/2 days.)
- Obsessively check status of your orders by clicking “track package” more times per day than is normal.
- Unpack boxes, all the while unwittingly filling entryway and hallway with obscene piles of cardboard and those little air cushion bags they pack stuff with for shipping.
- Find a place for everything and refill the pantry. (This will feel like a food-themed game of Tetris that is hard and unwinnable.)
- Realize you measured wrong in more ways than imaginable. Feel old and incompetent.
- Realize you should have drawn a scale model of the pantry and designated a spot for each individual container before you ordered.
- Remeasure remaining shelf space and order additional baskets, bins, and airtight containers.
- Repeat steps 12-14.
- Blog about your experience. (Note: steps 12-18 take about 2 1/2 weeks, but feel like an eternity.)
Let’s talk containers, because that’s really the most important decision you’ll make for this kind of project. My goal with containers was for one package of food from the store to fit entirely in one container; no pesky bags or unsightly boxes to contend with. And I wanted consolidation: like stored with like and no more scrounging for 6 bulk bags each filled with 2 tablespoons of lentils. I settled on OXO Pop containers and was delighted to find they even identify their products this way. For example, they suggest a 0.9 quart container for brown sugar and a 4 quart size for bags of flour. It all seemed so destined for success.
But as with any task of this magnitude, there were unforeseen stumbling blocks:
- It didn’t all come at once. I ordered all my stuff in essentially one evening. Most of it was from Amazon but some items came from The Container Store. What this meant was that stuff got delivered at drastically different times in the whole reorganization process. Some baskets and OXO Pops got here in 2 days, and others took 10 days. This delayed project completion which was frustrating.
- The house was in chaos for 2 plus weeks. We couldn’t easily find ingredients in their new locations in the living room and dining room and our typical food preparation routine was disrupted.
- OXO makes rectangle and square containers. I didn’t realize the difference when I was ordering and when they arrived I discovered they were not compatible for stacking. This messed up some of my plans for storing similar ingredients in the same area.
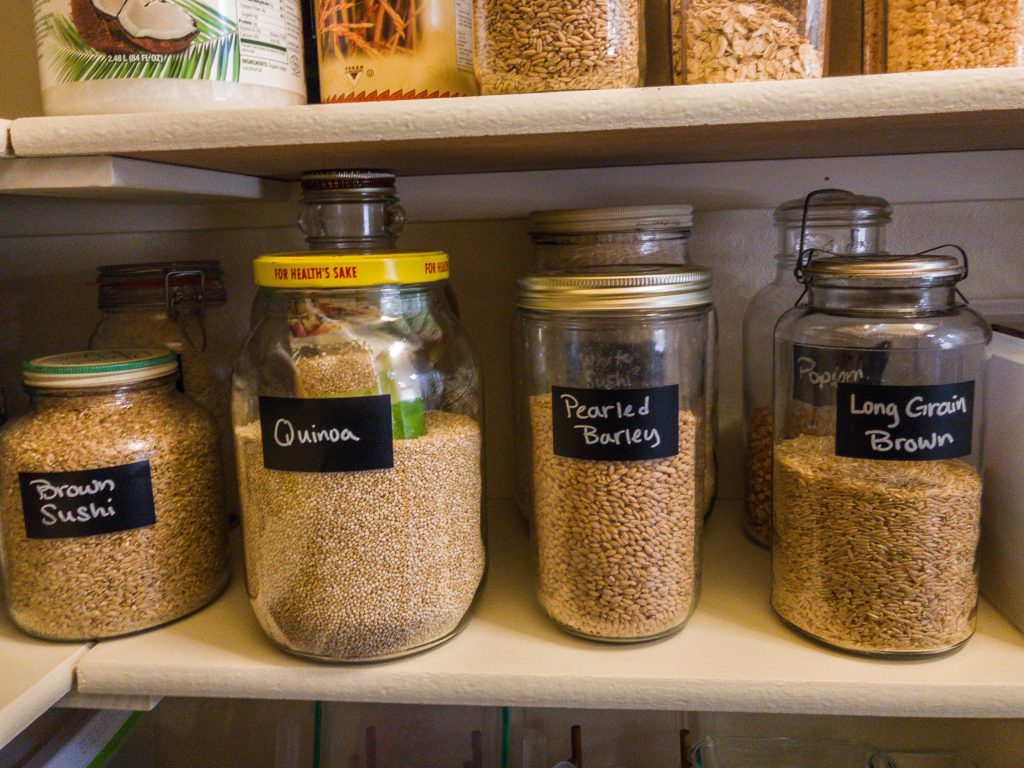
- I had two bags of quinoa that I wanted to combine into one new big jar. Quinoa needs to be rinsed before you cook it. Upon further inspection it turns out one brand was pre-rinsed and one brand wasn’t so it didn’t make sense to pour them in together. Putting like with like isn’t always a straightforward proposition.
- Taking food out of its box or bag streamlines the look of the pantry and allows for more uniformity visually, which is fantastic. However, when you toss the packing into the recycling, you’re also tossing the nutrition facts, cooking directions, expiration date, and recipes (like for Toll House cookies on the back of the chip bag). I ended up clipping the important parts of the label and just sticking them in the jar with the food. You could also write key info on the container labels, if you choose to go the label route.
- Once you get the containers, you’re still not ready to proceed. Every container has to be washed and dried thoroughly before being used. You certainly don’t want any water in the OXO container when you dump your bag of sugar into it. This seemed like a massive, but necessary, time hog for the impatient task-oriented parts of my psyche.
- Since we’re talking about washing, let’s get down to the nitty gritty: the OXO containers are hand wash only. Sigh. Canning jars (Ball, Kerr, Weck) are dishwasher safe but that’s not true for all glass jars. Many with the bail and seal closures (the wire contraption that you clamp down to close and seal the jar) are recommended to be hand washed as well. This is definitely a consideration for ongoing day-to-day maintenance of your new pantry organization system. Be sure to read the fine print on each product before purchasing so you’ll know what you’re signing on for.
- Recycling cardboard became my new hobby. There was so much packing material to manage, not to mention how much garbage I generated. We live in a condo on the third floor. The number of trips I made up and down the stairs felt absurd (but hopefully worked off some of my indulgent Christmastime eating exploits).
- I came face to face with the reality of my chocolate chip obsession. I have 9 types of baking chip-like items. NINE. I had to find containers for 60% cacao chips, 67% cacao chips, unsweetened chocolate discs, mini semisweet dairy-free chips, dark dairy-free chips, milk chocolate chips, cocoa nibs, peanut butter chips, and white chocolate chips. Who knew home organization would lead to drastic breakthroughs in knowing and accepting my food-related personality weirdness?
- I had to get used to disappointment. Just when I thought I was finally getting close to finishing, one set of OXO containers arrived damaged and one 2-gallon glass jar was delivered in shards. This required returns and more waiting and delayed gratification.
- I had to accept imperfection. I was forced to keep making little exceptions that veered from the original plan. For example, we buy oatmeal at Costco. So I searched for a container that would hold the contents of the whole gargantuan box. After some quick math, I settled on a 2-gallon glass jar. But when it arrived I realized it was so tall it only fit on the very top shelf. Practically speaking, it’s not easy to pull this monster down every morning just to get out 1/2 cup of oats. So now I keep an interim oatmeal container for daily use that gets refilled from the giant top shelf supply.
- The cost was more than I bargained for, literally. And to add insult to injury I ended up buying more stuff after the initial spending spree to make it all fit and be able to finish the project.
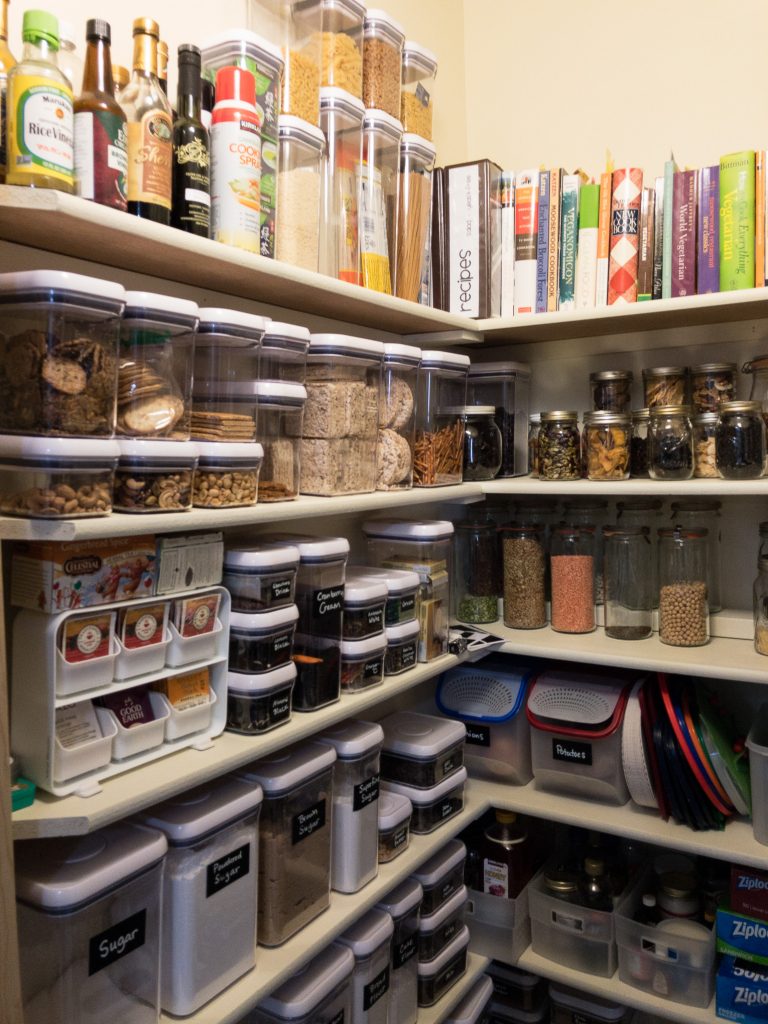
But it was all worth it. How do you properly do a dramatic reveal in a blog post? Do I ask you to scroll extra slowly? Well, cue the theatrical music, because here it is:
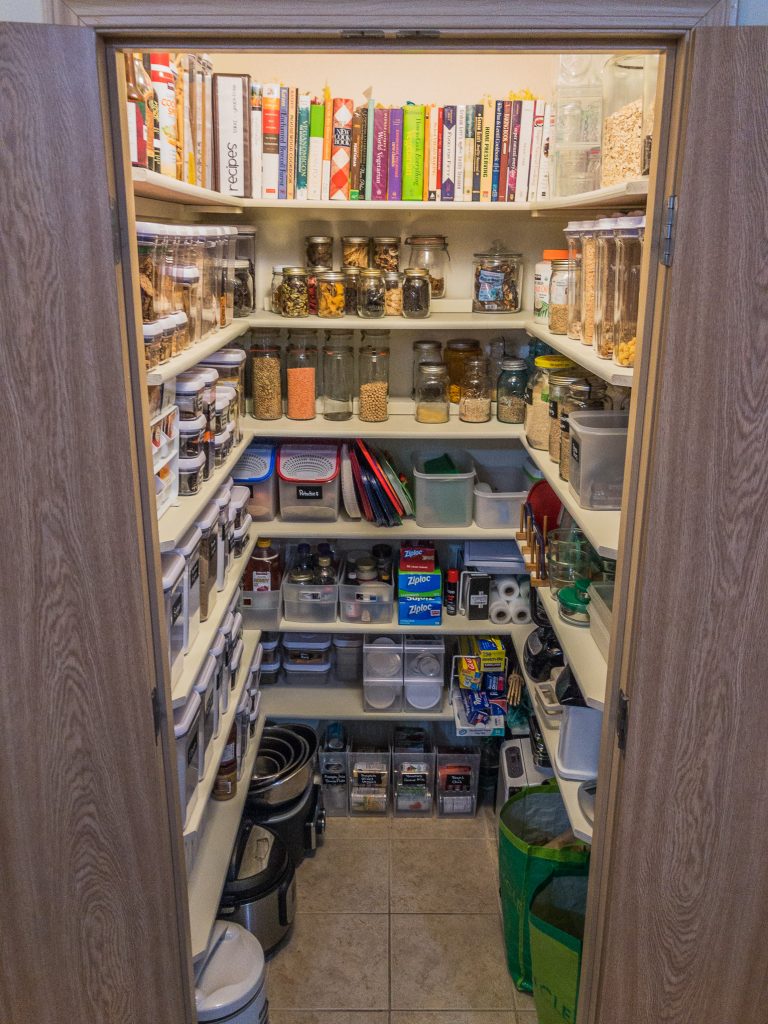
Have I mentioned I’m satisfied with the final product? I really am, despite my list of grievances. Let’s shift gears and talk about what worked.
- Writing down which storage basket or container was purchased for which food. I really did forget easily and I referred back to that list what felt like a million times.
- Aiming for single file storage for improved visibility. This was one of the tips I read over and over before I started and it really makes a difference in the daily use of the space, and it really drives your purchases. What size container is the same depth as your shelves? How can you position food so you don’t lose sight of what’s pushed to the back?
- Opting for clear/see-through containers (glass or plastic). This is one of my favorite results of the reorganization. It’s easier to visually check availability of ingredients before making your grocery list and you can clearly see what’s available for snacking when you wander into the pantry with the munchies. Nothing gets lost or forgotten.
- Embracing risers. If you have deep shelves, risers can keep everything visible by raising jars or cans up a few inches. This is a nice option if you have stuff that doesn’t make sense to store in deep bins but you still want to optimize space. There are lots of different kinds you can buy, but we went the cheap route: a couple of painted 2x4s.
- Considering what items get used the most and putting them in the most accessible spots. I’m still deciding if I was successful with this. I think I’ll need to use the pantry for a few weeks to fully evaluate functionality. I did tuck the hard alcohol away in a dark corner on the floor, because it essentially only ever gets used in random baking adventures. But I tried to make tea and bento boxes readily accessible because they get used every day.
- Deciding on chalkboard labels. After much deliberation I ordered chalkboard labels and a chalkboard pen, and it’s a very convenient system. I did hold back a bit in my labeling hysteria and tried to intentionally choose what needed labeling if it was difficult to visually distinguish it from similar-looking foods. Pearled barley vs. wheat berries, yes. Whole wheat pastry flour vs. whole wheat flour, yes. Cashews vs. peanuts, no.
- Thinning out my cookbooks. The time had come and I was merciless. I whittled the collection down to a third of what I started with, all with the goal of getting them to fit on a single shelf in the new pantry.
- Buying a dedicated step stool. This was necessary for being able to easily and safely retrieve items stored on the very top shelf. In the past we’d hauled a 2-step ladder in from the front closet but I decided it was time to get a simple, single-step, collapsible one that can permanently live in the pantry.
If even after you’ve suffered through the account of my pantry reorganization alongside me, you’re motivated to tackle your own, I do have some words of possible wisdom on what would I do differently next time.
- I would purchase more of the containers in person instead of online. This would allow visual inspection for damage as well as visual assessment for size, less waiting around for deliveries (i.e. near instant gratification because you can take it home right there and then), less packaging to deal with, and likely a smaller carbon footprint. Also, while Amazon make returns remarkably easy, I’ve discovered that returning unwanted items to The Container Store can be cost prohibitive in terms of shipping. Next time Bed, Bath and Beyond or HomeGoods would be my first stops.
- I would consider the relative merits and weight of glass storage vs. plastic. If your shelves are sturdy they can probably stand up to a massive collection of canning or other jars, which would cost less overall. But I was dealing with already sagging shelves and probably should have thought more about the combined overall weight of the storage containers I was purchasing for the project.
Was it worth it? Absolutely. And by next month I’m sure I’ll have forgotten the emotional trauma of the last 3 weeks and I’ll just be enjoying the clean lines and orderliness of my pantry. My expectation in tackling this task was to reduce daily stress and increase daily convenience of using this high traffic part of the kitchen and I can tell you the fruits of my labor have already begun. In hopes of reducing the mental anguish of your potential pantry overhaul my advice to you is simple: measure 17 times, buy once.

10 thoughts on “Reorganizing My Pantry”
This is AMAZING!!!!! It looks so nice and neat!!!
I really want to do this and have been trying to find ONE style of container for everything but really like the look of your combined systems – glass and plastic.
Thanks for taking us on the journey with you!
Hi MB! Thanks for taking the time to read the post and comment. Choosing the right container really is a big decision. I’d love to know if you take the leap and redo your pantry!
Kristine- it looks awesome! I’d say the hard work was worth it.
Thanks Miss Laura!
Wow ! Thats amazing !, and everything is highly visible at a moments glance
Great job !! A new career for you !, Come do my house next !!
Hi Carlos! Thanks for taking the time to make a comment. It was pretty satisfying, so perhaps a side career as organizer.
Wow, that looks amazing! Congratulations on creating such a lovely pantry and thank you for such an entertaining post about the process 🙂
Thanks Stacy!
Holy guacamole! A pantry to worship food in!
This inspired me to organize mine.
Let me revise that. This inspired me to HAVE an organized pantry.
But because I didn’t want to do it, I asked my 8-year-old if he’d like the job. Good news! He said yes, and an hour later our pantry looked far better. And his organization system was something I’d never think of (items grouped not by type but by size and color).
Remarkably, just seeing weird ingredients next to each other has me to make some pretty interesting dishes over the last couple days. Nothing I’d serve a guest, but, you know, life-sustaining.
Someday, though, I’m gonna do this gorgeous business. Thanks for sharing!
Miss Candice! I’m impressed by your delegation skills, and by his organization strategy. I’m so glad you enjoyed the post. I’m definitely going to need to see before and after pics if you tackle the big reorganization. (Hope your new job is going swimmingly.)